


The Ultimate Guide to Nipple Grafts: Techniques, Risks and Recovery
Nipple grafts are a highly successful procedure in which skin is removed from one location and transferred to another. This article provides an overview of the procedure, including the process of skin graft survival and the steps that can be taken to maximize the chances of success. We also go over the difference between a classic nipple skin graft and a composite nipple graft; the former only resizes and repositions the areola whereas the latter allows for both the areola and nipple to be resized. Discover the threats to nipple graft survival such as bleeding during the procedure, infection, smoking, and uncontrolled medical conditions. We also explain the concept of “shear force” and how it can impact nipple graft survival. Read on to help you prepare for your gender confirming surgery.
Many patients worry about nipple skin graft survival. It can be helpful to understand how skin grafts work and to know what you can do to maximize nipple graft survival. In our practice, nipple grafts are completely successful about 98% of the time.
Skin grafts are rather miraculous things! We can take a piece of a person’s body, remove it from their body, and put it somewhere else on the body where it will stay and survive. It’s an amazingly reliable procedure. In our practice it is extremely rare to lose a considerable portion of a skin graft for any reason, and we have not had a patient completely lose any of the hundreds of skin grafts performed.
How Nipple Grafts Work
First, we gently remove the outer layer of skin from the location where the graft is being relocated. Think of it as skinning your knee pretty deeply, but in a much more controlled manner. The skin graft is then placed on the ‘open’ area.
Immediately after placement, the body is developing new blood vessels that will grow into the graft. To make sure the graft has solid and continuous contact with the body during this process, the surgeon places a bulky ‘bolster’ dressing on the graft that is tied down to the skin with sutures. When the surgeon removes the outer bolster dressing about 1 week after surgery, the grafts are a little bit delicate, but already have a new blood supply. During days 7-21 after surgery, the graft gains a lot of strength, and is quite resilient after 21 days. By 42 days (6 weeks) after surgery, the grafts should be fully healed and usually have the strength of non-grafted tissue.
Composite Nipple Grafting
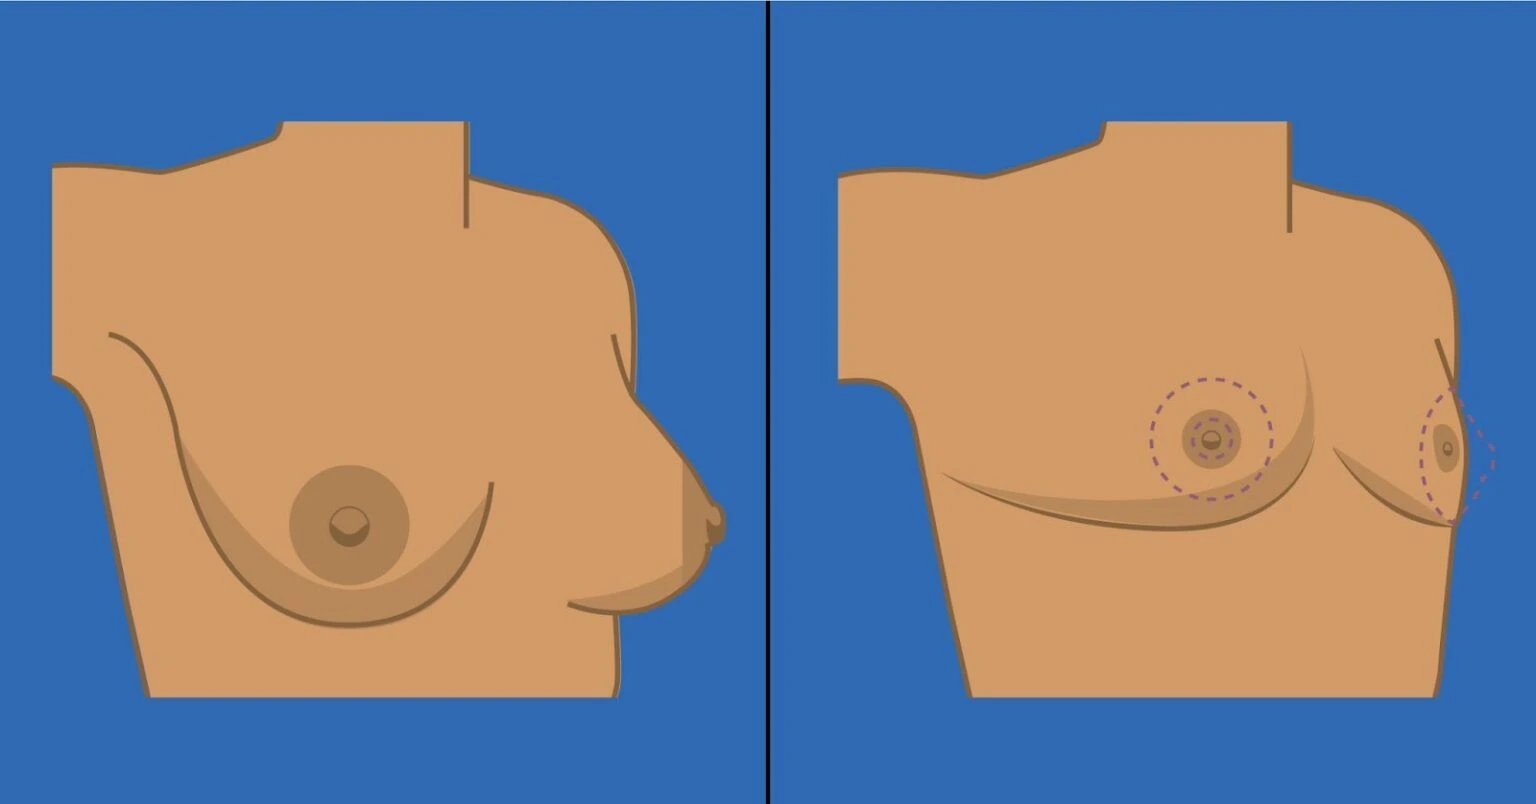
The composite nipple graft technique is an option available for patients who would not only like to reduce the size of their areola through top surgery, but also their nipple. By areola we refer to the pigmented skin around the nipple, whereas nipple refers specifically to the knob of tissue at the areola’s center. This procedure is an excellent option for prospective patients with larger, protruding nipples who would like them to be smaller. The decision to decrease nipple size is often motivated by the desire for the nipple size to be proportional to the new areola size, so that the nipple does not overshadow the areola. Likewise, a composite nipple graft is often pursued by those who wish for their nipple and areola sizes to be more proportional to the average dimensions of cis men who undergo a first, testosterone-dominant puberty.
With this technique, our surgeons typically aim for a 1.8 to 10 nipple to areola diameter ratio. In other words, the composite nipple graft technique typically results in the creation of a nipple with a 4mm diameter inside of an areola with a 22mm diameter. If you would like to discuss your goals and questions around areola and/or nipple resizing for top surgery, you can contact our surgical team to set up a free, virtual consultation here.
A composite nipple graft can be performed with any top surgery incision type, for either chest reconstruction or breast reduction, making it an option for all eligible top surgery candidates. The technique is composite because it involves two grafts: the areola and nipple are grafted separately, not together. This allows for the nipple to be cut and resized to meet the patient’s goals. The graphic below illustrates what this change can look like.
Healing protocols for the composite nipple graft are the same as the care instructions for unitary nipple grafts. This technique also carries the same risks around sensation and graft loss as a unitary nipple graft. Many patients who undergo the composite graft will experience nipple scabbing or “sluff”. Patients might notice the resized nipples scab up and experience those scabs fall off, especially while showering. This is not a cause for concern as it is a normal part of the healing process. Despite how large the fallen scab tissue may be, it is not an indication that the nipple has fallen off; underneath there will be a new, healing nipple.
Nipple Graft Healing Process
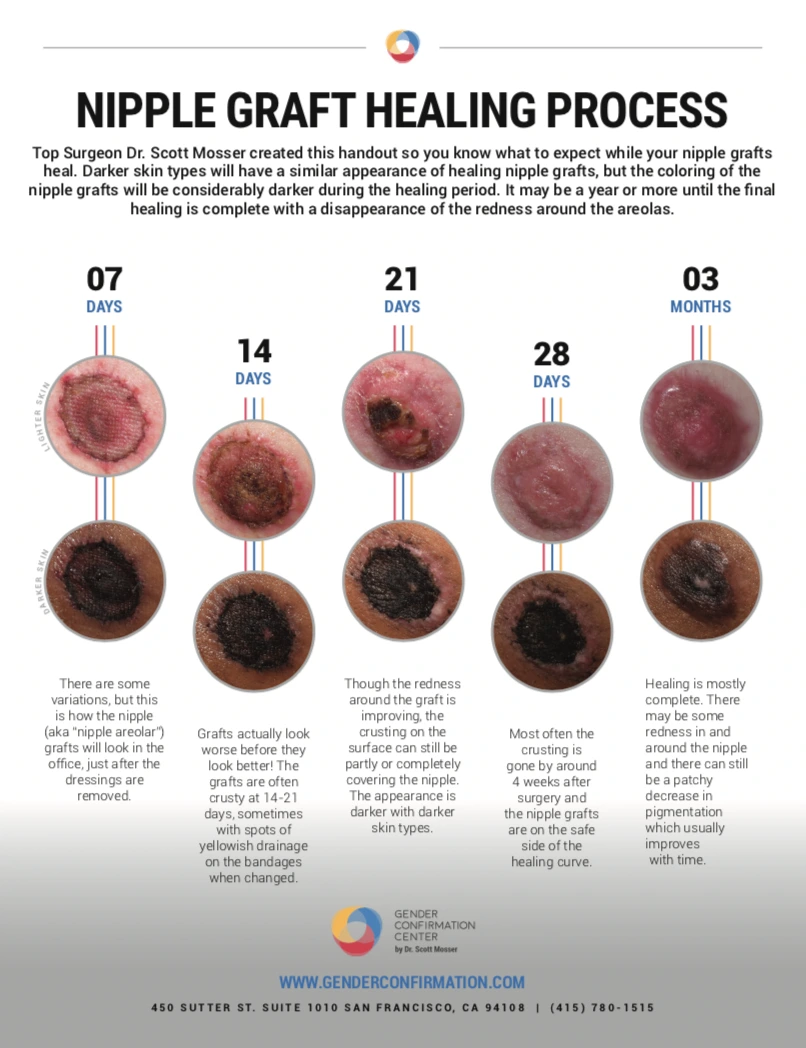
It can take up to a year or more until the final healing of nipple grafts is complete and the redness around the areolas has disappeared. When nipples heal it is normal for them to look worse before they look better, especially around 14-21 days after surgery. Our surgeons have created a visual breakdown of what most nipples look like from 7 days after top surgery all the way up to 3 months. For a printable version of the nipple healing process pictured below, click here.
For additional information about taking care of your nipple grafts, here is a video by Dr. Facque (he/him):
Threats to Skin Graft Survival
Anything that impairs the ingrowth of blood vessels can impact the survival of a skin graft. As you read above, the arrival of new blood vessels within a tight time frame is an important component of skin graft survival. Here are the various issues that can cause a problem:
- Bleeding during the procedure. If the area beneath the skin graft is filled with blood, the blood vessels cannot grow through a collection of blood into the graft. Surgeons do everything they can to control for this issue, including using a vasoconstrictive agent to the area which is prepared to receive the graft, and applying a pressure dressing to help the graft heal.
- Infection. This is also controlled by the surgeon by using IV antibiotics and maintaining a sterile operating room
- Smoking. Smoking can cause issues with blood flow, and so we encourage patients to stop using anything containing nicotine in advance of surgery to ensure your body is able to adequately heal and establish blood flow to the new nipple grafts.
- Medical conditions, such as uncontrolled diabetes, can cause issues with healing. Your primary care provider can work with you and your surgeon to ensure any conditions you have are well-controlled and will not adversely impact your surgery.
- Shear Force. This is one factor patients can consistently have control over and you can read more about how below.
The “Shear Force” in Nipple Grafts
A “shear force” is a sideways force of one plane being pushed to slide along another plane. Imagine blood vessels slowly making their way into the skin graft. If, at any point, the skin graft is pushed to the side, it would interrupt the ingrowth of those vessels. This would potentially result in failure of the vessels to arrive on time, and therefore failure of the skin graft.
To protect the graft from shear force, during surgery we place a thick dressing on top that securely presses the graft down. This keeps fluid from collecting underneath the graft and protects it from shear forces from the side. A compression garment is often used, since it helps to keep the graft from being bumped to the side – (either during sleep or daily activities). We strongly advise patients to avoid pushing the garment to the side or brushing their chests inadvertently with an arm to avoid creating shear force.
In our experience, it’s a better than 98 % chance of having a successful full thickness nipple graft.
Here’s an infographic that helps spell out this process of nipple graft survival. A PDF image of this diagram can be downloaded here. You can also find a video of Dr. Mosser explaining the procedure below.

Bonus! Here’s a video by Dr. Mosser (he/him) to bring it all home and show again how this works:
Click Here to Request the Next Steps to Schedule a Consult!
We offer complimentary virtual and in-person consultations with our board-certified surgeons. Click here to complete our consultation request form to learn more about the next steps in your patient journey.
BOOK CONSULTATION
Suite 1010, 450 Sutter St
San Francisco, CA 94108
Phone: (415) 780-1515
Fax: (628) 867-6510
GCC business hours are from 9:00 am to 4:00 pm
GCC phone hours are from 9:00 am to 4:00 pm
GCC phone hours are from 9:00 am to 4:00 pm
Board Certification
& Memberships
Copyright © 2023 GCC (Gender Confirmation Center). All Rights Reserved.